Visual Studio Code has support for Remote Development which is a really cool feature. You can connect to another machine via SSH and work with code there (the language services etc run remotely which is the really cool part!), connect to the Windows Subsystem for Linux, or run your development environment in containers (aka dev containers). The last of these is the topic for this post.
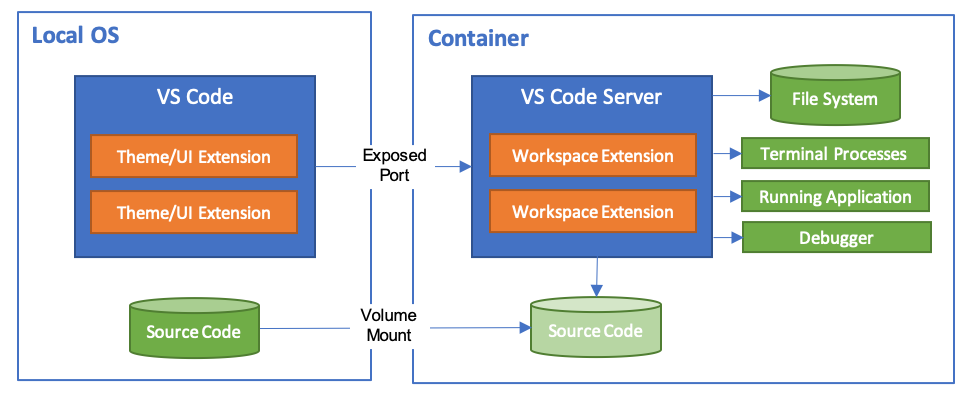
My team has been using dev containers quite heavily for the last few months and found a lot of benefits with them. They allow you to describe your development environment with a Dockerfile and run your tools, terminal and debugger inside that container whilst keeping the editor UI local. This image from the docs shows this split:
Our recent project had several code repos and dev containers really helped when we were switching between repos as once the dev container is built and running you have all the tools you need - there’s no list of pre-requisites that you need to check to ensure you have all the required tools (and versions). This helps to ensure that all developers are using the same toolset.
The remainder of this post will call out some cool features of dev containers and my current (and totally subject to change) thoughts on working with them! The good ideas in this post are a credit to the team, but this post is a summary of my thoughts on dev containers so if there’s anything you disagree with assume that it’s my idea :-)
Links to sections:
- Dev containers for CI builds
- What should go in the dev container?
- postCreateCommand (e.g. for package install)
- Pin your tool versions
- Using volumes
- Handling multiple platforms
- dotfiles and user extensions
- working with git (why you don’t need to mount .gitconfig)
Dev containers for CI builds
Dev containers provide an environment configured to contain all the tools you need to develop and build your project. As a result, they are a great option to consider for your CI (Continuous Integration) builds.
When you are working with the dev container in VS Code it takes cares of building and running the dev container image. The general idea for the CI build is to run a docker build for the dev container image followed by a docker run of that image specifying the command to build your project (e.g. make build). This way the CI build is executing in the same context as your local development.
One thing to consider is that your build times may increase due to building the dev container if you use a clean build agent for each build (on your development machine rebuilding the dev container after changes can re-use cached layers). There are various ways to approach this:
- the azure-databricks-operator build definition uses Azure DevOps Pipelines and uses the Cache Task to cache the docker image between builds.
- in azbrowse the
Makefileperforms adocker pullto pull a previous image to help speed up the build
UPDATE: if you’re using GitHub Actions or Azure DevOps Pipelines, check out this action/task for working with dev containers in CI
By using the dev container in your build pipeline any dependency that you add to your development environment is automatically added to your build pipeline :-)
What should go in the dev container?
When working with dev containers, at some point you have to work out what not to put into the dev container. For example, if you’re working with a golang project, do you add the go.mod and perform a go mod download to pull down packages? It can be tempting to keep putting everything you need/use into the dev container image.
My current rule of thumb is to put tools into the container and leave other things such as packages out. This helps to reduce the number of reasons for a dev container image to change, which reduces the number of container image rebuilds on your local machine and maximises caching on the build server; this all helps to keep productivity high.
postCreateCommand (e.g. for package install)
Having said that packages shouldn’t go into the dev container image, if your project has packages that it depends on then you probably need to pull them in once the dev container is up and running. An example of this is when working with python; until you have performed a pip install for your packages the editing experience in VS Code is sub-optimal as it hasn’t got the information needed to give code completion etc.
Fortunately, dev containers allow you to configure a postCreateCommand (see the docs for devcontainer.json). This command is run after the container is created, so setting this to something like pip install -r requirements.txt will automatically install the required packages for your project giving you a productive environment once the dev container is loaded.
NOTE: see the section on volumes to help reduce the impact of pulling packages
Pin your tool versions
This one seems obvious with hindsight (!), but when you are adding tools to the Dockerfile it is easy to overlook pinning the install to specific versions (not least because the instructions for tools typically don’t call this out).
We didn’t do this initially and then got strange behaviour across team members when the tool behaviour changed in a new release. We ended up in a situation where everything worked on one machine but not on another (something which dev containers should help to avoid). It turned out that there had been a new release of one of the tools that changed its behaviour and on the machine where things had stopped working the dev container had recently been rebuilt causing it to pick up the new tool version. The machine where everything was still working had last rebuilt the dev container prior to the new tool version so still had the old one with the expected behaviour!
In short, pin your tool versions (as shown here for some golang tooling).
Using volumes
Preserve data across instances (working with packages)
As discussed above, my feeling is that packages should live outside the dev container image. This means that you end up pulling the packages each time you build. To avoid that you can mount a volume so that the location that packages are cached in is persisted across container instances. The exact folder will vary by language but here’s an example of mounting a volume for the /go/pkg folder for golang packages in the Kubernetes CronJob Pre-scaler project.
Another great reason to mount a volume is to preserve bash command history across sessions. By scoping the volume name to include the project name you end up with command history scoped to the project which is a very nice side effect!
Share data from the host
Another scenario for mounting volumes is to mount volumes from the host within the container. An example of this is to mount the ~/.azure folder which contains your login credentials for working with the Azure CLI.
This can help working in the dev container to feel more productive, but it is important to be aware that this starts to break down the idea that the dev container is a self-contained environment with everything needed for working with your project so needs to be used with caution. As an example, mounting the .azure folder will also bring over any CLI extensions that you have. If you take a dependency on them in your project then you can get into a situation where things work on your machine but not on other people’s.
NOTE: In the case of the
.azurefolder, you can specify theAZURE_EXTENSION_DIRenvironment variable to override the location for storing extensions. I haven’t tested this yet but my plan is to set this next time I set up a dev container with a mount for the.azurefolder.
NOTE2: When some of the projects I’ve linked to were set up there wasn’t support for the
mountsproperty indevcontainer.jsonso some references still use therunArgsto specify volumes. See the next section for an example of themountssyntax.
Handling multiple platforms
On our last project we had developers working across Windows, Mac and Linux machines on the same repo. This made it interesting when trying to mount folders such as the user’s .azure folder. In the end we settled on using the HOME and USERPROFILE environment variables in combination. On Windows USERPROFILE is set and on Mac/Linux HOME is set:
"mounts": [
    "source=${localEnv:HOME}${localEnv:USERPROFILE}/.azure,target=~/.azure,type=bind,consistency=cached",
]
This worked fine on Mac and Linux, and worked on Windows if you launched VS Code directly or from cmd.exe. However, PowerShell sets up the HOME environment variable so if you launch VS Code from PowerShell you end up with both environment variables set which generates an invalid path! Unfortunately I tend to use PowerShell to navigate to a folder and then run code . to load VS Code in the current folder. As a workaround I unset the HOME environment variable in PowerShell and everything started behaving correctly.
# Run this to unset the HOME environment variable
$env:HOME=""

# Or, run this to modify your PowerShell profile to unset it automatically
Add-Content -Path $PROFILE -Value "`n`$env:HOME=`"`""
dotfiles and user extensions
Another interesting feature in dev containers is support for dotfiles. This allows you to add in a git repo with scripts to clone and invoke when a container is created. As with the note in the section on mounting host volumes such as .azure, this is an area to exercise caution. It is important to be mindful of what customisations you apply with this to ensure that they are not things that should be part of the core dev container experience.
For me, dotfiles with dev containers are a useful way to add in a few aliases to work around finding it hard to retrain my brain (I’m still fairly hard-wired to use cls and md rather than clear and mkdir). I also use it to ensure that I have bash-git-prompt installed. None of this is central to being able to work with a project, but all makes my life easier.
For what it’s worth I generally include bash-git-prompt in dev containers that I set up as I feel that it’s useful, but dotfiles support allows me to keep my preferred way of working even when working with dev containers that others have set up :-)
Another customisation area similar to dotfiles is Always Installed Extensions. This user setting allows you to specify extensions that you always want installed in any dev container that you use but again use caution to ensure that they aren’t central to the experience of working with your project. Some examples for me that I view as part of my workflow (rather than the project tooling) are git graph and git rebase shortcuts.
working with git (why you don’t need to mount .gitconfig)
In some of the projects I’ve referenced through this post you may see the .gitconfig mounted from the host. The dev containers experience has moved on since we set up these projects and now VS Code will copy over your .gitconfig and then modify it to configure git to use a credential helper that forwards credential requests to your host machine. This is a really nice touch as it means that working with git in the dev container still functions even if your host (and git repo) is configured to use a credential helper that expects user interaction: that interaction happens on your host machine as part of the forwarded credential request. More info in the docs.
Summary
I plan to come back to edit this post as I learn new/better ways of working with dev containers (and as dev containers continue to evolve), but hopefully the ideas here help you get started. For me, using dev containers has been a really positive experience overall and has smoothed the process of transitioning from repo to repo!
P.S. If you liked this, you may also like my book “WSL 2: Tips, Tricks and Techniques” which covers tips for working with WSL 2, Windows Terminal, VS Code dev containers and more https://wsl.tips/book :-)